Staging is presenting your idea in the clearest, most entertaining way possible.
It consists of setting up storyboards and layouts before animating and finalizing.
You need to make sure to set up your camera so that all the characters and props and background you need are in the shot. Then block out the characters
Character blocking= A character's movements and positions on the stage
Silhouettes are very important in staging- the audience must know exactly what is going on with the characters (they need to be readable immediately). This is important in comics as well.
Which one of these sets of silhouettes reads better in this scenario?

You can probably tell the first character is angry and the other is frightened in the second one. The first set of silhouettes is vague; the elf could be telling the fox a fun fact about gorillas for all we know. Get the hands clear of the body.
Of course, not it may look like the elf's trying to scare the fox...uh oh '^_^ On to the next principle...
Of course, not it may look like the elf's trying to scare the fox...uh oh '^_^ On to the next principle...
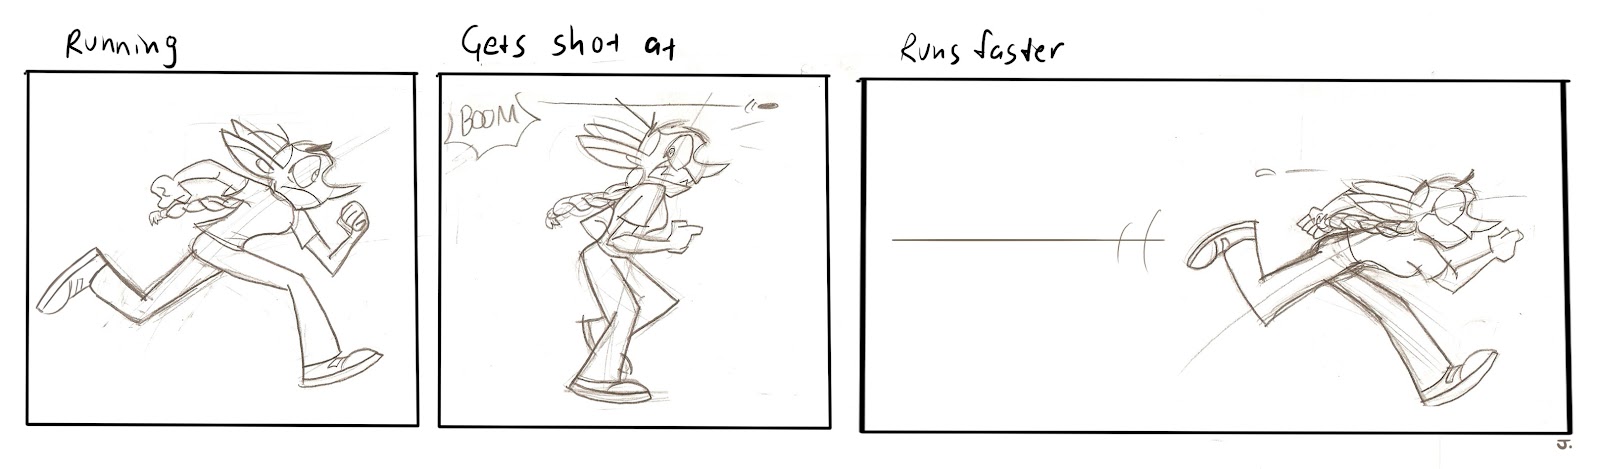
Anticipation is the buildup to an action.
Consists of 3 parts:
1. Show the audience what you're about to do
2. Carry out the action
3. Show the audience what you've done
Sometimes there is no anticipation for an action, for example if a character is about to be hit by a large object or run into a doorframe they don't expect it. Try planning out the action before you start animating it- act it out first.
Remember that the body is never completely still. (Unless it's dead...) Anticipation helps the audience understand what's happening and makes the action more realistic.
Contrasting anticipation is when a character anticipates something but it falls through and doesn't happen. (A character may be pondering life, then suddenly a great idea pops into his head, but he realizes it can't work so he goes back to normal).
Ease in and Ease out (or Slow in/out) is timing actions so that they don't seem too abrupt.
Easing into an action cushions the movement for realism so the audience doesn't miss an important gesture.
Blinking is a good example of how this principle makes a difference- are they blinking quickly? slowly? rapidly? Blink speed says a lot about how a character is feeling.
When to not use it:
Some cartoons, such as Ren & Stimpy, prefer a snappier animation- characters jump into poses quickly to exaggerate and add humor (and boy, is it humorous..) If you go that way, your keyframes had better be good.
Also, if a character is about to be hit by a heavy object, the character should not slowly ease out of the sudden blast of momentum and force, but show a quicker transition from "not-hit" to "hit (violently and painfully)," though after they are on the ground twitching from pain you may use the ease out to show their follow-through.
If a character is suddenly frightened, excited, or shocked by something, you may not want to ease in either.
Arcs are paths of movement that seem more natural than linear movement.
Again, in nature there are no things that move in mechanic, linear ways. It is more realistic for characters' gestures to move in arcs than in straight lines.
Secondary actions are those that support or enhance a main action.
If a person is walking, then waves at someone, the wave would be the secondary action to compliment the main action (walking)
Timing and Spacing shows the audience how fast things happen.
When setting up keyframes, keep in mind how fast the character will make it to each point. When animating the in-betweens, include more to slow the animation down and more to speed it up. If a character moves from one keyframe with fewer frames, they appear to be moving more quickly.
The timing of one action can completely change the meaning of it. If there is a person sitting down, and another person comes up and asks "What's wrong?" the first person may lift up their arm sluggishly, then slowly point at another hulky person who just took their lunch money. In another scenario, they may quickly lift their arm up and swiftly jab their finger in the direction of a hulky person who just stole their lunch money. The slow motion reveals sadness, the quick one reveals anger and revenge and the desire to steal all the chainsaws in the world and tear apart the person who stole their lunch money. Or annoyance.
The tutorials didn't really explain this principle in a way I could understand it so I looked it up here
Holding a pose a little longer than natural to exaggerate it may give the audience time to absorb what just happened.
Exaggeration can also be what separates one character from another. Add exaggeration to their actions to develop a certain personality.
Squash and Stretch helps things look less rigid by exaggerating movement while maintaining volume.
The video showed an animation of a wolf creature running. While it was running, they made it so its muscles bulged but still maintained the same volume. They also stretched out his arm midstride so that is appeared longer than natural for a short amount of time. This really improved the look of the animation and made it more fun.
Pose-to-Pose Animation is when you draw the key poses of the figure to help time the animation before you draw the inbetweens. Or, as the tutorials put it, "Making sure everything's timed to the director's approval."
Straight-Ahead Animation is when the animator takes a pose and then starts drawing the actions. Or, "They take a pose and just go for it."
Using a combination of these is a preferable to build an animation- Draw the key poses and then use straight-ahead to fill in the gaps.
Appeal is anything an audience enjoys watching.
The tutorial showed adding appeal through composition and gestures. Adding little secondary movements here and there or exaggerating actions (basically, using the 12 principles) assists the animation in becoming funner to watch.
Here, it explains appeal is "styling to achieve the cosmetically attractive as well as an engaging personality. This doesn't mean to say that all characters should be stereotypically beautiful or handsome, but that our villains are suitably villainous and our heroes worth rooting for."
This explanation makes more sense to me in either 2d or 3d context. Though I'm still confused, I've read over at here some more specific aspects of appeal: aesthetics, distillation, and expressiveness.
Follow-Through and Overlapping is basically making sure that all parts of your animation have realistic movements and are affected by the laws of physics such as drag, mass, momentum, inertia, and force.
If a character is in a walk cycle, their arms will swing from side to side to balance the movement of their feet shifting forward and backward. If they stop, their arms may swing forward a little bit from the momentum of the body's movement. If a character turns their head, their hair may drag behind them a little as it has been sitting there and its inertia keeps it from moving forward immediately.
Overlapping actions are multiple independent actions that move at their own pace all caused by the main action or helping the main action happen.
Solid drawing is checking for depth, weight, and balance while making sure the poses are as clear as possible.
I was extremely confused on what this was from watching the video, so I looked it up here
It is important to apply solid drawing so your character doesn't appear flat and unrealistic. Avoid twinning. Try drawing things from an angle rather than straight-on to make it appear more natural.
Twinning= Mirroring an action on both sides of the body- a character's hands may appear parallel and even doing the exact same thing

You aren't designing cardboard cutouts. You may be drawing in 2d, but your drawing is representative of a more complex 3d character or object.


